A Utah Road trip is a MUST-DO for any road trip lover out there. It’s got ALL the road trip essentials- epic views, dispersed camping, diverse landscapes, jaw-dropping scenery, country roads, and OF COURSE, five for the price of one National Park wise! Utah’s “Big-5” or “Mighty-5” refers to five iconic national parks (Zion, Bryce Canyon, Capitol Reef, Canyonlands, Arches) located in the state of Utah all within a day’s driving distance of each other.
If that’s not enough convincing to Road Trip Utah, then I don’t know what is. Below I’ve outlined a two-week day-by-day itinerary for your epic Utah Big-5 Road Trip!
This Utah road trip itinerary involves a lot of day hikes, so be sure to check out our Day Hiking Essential’s so you don’t forget anything!
Contents
| ***Disclosure: This post contains affiliate links. If you click one of them, I may receive a small commission (for which I am very grateful for) at no extra cost to you. |
The Best Time of Year to Road Trip Utah
The best time of year to go on a Utah road trip depends on your preferences and the activities you want to enjoy. Utah experiences four distinct seasons, each offering different experiences and fun things to do, so there’s no “bad” time to visit!
Spring, March-May
Spring is a popular time for a Utah road trip, especially in late April and May. The weather is mild, and the landscapes come to life with colorful wildflowers and budding trees. Many of the national parks are less crowded compared to the peak summer months. However, keep in mind that some higher elevation areas may still have snow during early spring.
Summer, June-August
Summer is the busiest and most popular time for road trips in Utah. The weather is generally hot, especially in the southern parts of the state, making it an excellent time for activities like swimming, river rafting, and exploring slot canyons. The national parks and tourist attractions can be crowded during this time, so plan ahead and expect larger crowds.
Fall, September-November
Fall is another great time to road trip Utah. The weather starts to cool down, making outdoor activities more comfortable. The fall foliage in some areas, such as the mountains and certain canyons, can be stunning, offering excellent opportunities for photography. September and October are generally less crowded, but popular national parks may still see a fair number of visitors.
Winter, December-February
Winter is a unique, but breathtaking time to make your way across Utah. Between snow covered landscapes, fewer crowds, cheaper accommodation and winter activities like snowshoeing- road tripping Utah in winter is an adventure like non other! BUT, alternatively winter also brings snow and icy roads, limited park access, and shorter daylight hours… so just be aware of that.
What Kind of Vehicle Do You Need to Road Trip Utah?
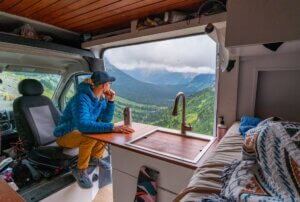
It is essential to choose a vehicle that can handle the diverse landscapes and sometimes challenging road conditions you might encounter on your Utah road trip. My personal favorite option is to rent a camper van! Camper vans’ aren’t necessarily good for off-roading nor are they fuel efficient, BUT Utah has so much dispersed camping that make travelling in a camper van a super fun (and cheap) experience!
Factors to consider when choosing your Utah Road Trip Vehicle:
- High Clearance and 4WD/AWD (Optional): While many of Utah’s main attractions can be accessed by regular passenger vehicles, having a high-clearance vehicle (e.g., SUV, crossover, or truck) can be beneficial for exploring off-the-beaten-path areas and rougher roads, especially in national park backcountry or remote regions. Four-wheel drive (4WD) or all-wheel drive (AWD) can be advantageous for added traction in sandy or muddy terrain or when navigating snowy roads in winter.
- Fuel Efficiency: There is a lot of driving in this itinerary so it’s important to consider your gas efficiency when choosing a vehicle.
- Good Suspension and Tires: Utah’s terrain can be rough, with unpaved roads and occasional potholes. A vehicle with a well-tuned suspension and good quality tires can provide a smoother and safer ride.
- Comfort and Space: Since you might spend a considerable amount of time driving, choose a vehicle that offers comfort, enough space for passengers, and adequate cargo capacity for your luggage and gear.
- Reliability: Reliability is crucial for any road trip. Ensure your vehicle is in good condition and has been properly serviced before hitting the road.
What to Pack for Your Utah Road Trip
The best part about road tripping is that you can pack anything and everything as long as it will fit in your car! We have road tripped across the U.S. > 10x and while we definitely switch up brands/items/supplies based off of where we’re going, we ALWAYS pack these items as they have proved to be used and abused on every trip we go on!
Must have items for your Utah road trip:
Car charger: Having a way to charge while on the road is essential!
Phone mount: We didn’t have one of these for a long time and had no idea how much we were missing out on. I used to call this a luxury but now I would categorize a phone mount as an essential.
Travel pillow: For all my fellow passenger princesses out there- you MUST get a comfy, portable travel pillow. Game changer.
Comfy blanket: For the cold souls in the car! The Rumpl is the BEST and I love the multicolors of this one!
Flashlight: You never know when you might have to pull over on the side of the road in the dark. A flashlight or headlamp is a great tool to have.
Kindle: I’m much more of a “Real book” gal myself, but a kindle is nice to use while travelling!
Reusable water bottle: We love sustainability! A reusable water bottle is one of the simplest ways to reduce your plastic use.
Portable towel: For showering, hand & face washing, or possible spills. The possibilities are endless with a travel towel.
Body wipes: For the moments you don’t have access to a shower! Trust me, your time will come, and you’ll be thankful for your wipes.
Hanging toiletry bag: Great for public bathrooms! We love a hanging toiletry bag.
Packing cubes: Organization on the road is IMPERATIVE! We absolutely love packing cubes!
Cooler: What’s a road trip without cold snacks and drinks?! REI has a great affordable soft cooler that’s perfect for your Utah road trip!
Chairs: Packable, lightweight, comfortable, & affordable… this is the only chair I’ve found that fit all four categories.
Camp stove: The tried-and-true Coleman stove! We’ve had one for years and absolutely love it!
Utah Road Trip Day 1-4: Zion National Park
Day 1: Las Vegas -> Zion National Park
Miles: 166 mi (route crosses time zones)

Las Vegas is the PERFECT start/end point for your 14-day road trip! Go ahead and rent your car right from the airport and head straight to Zion National Park! This is a great afternoon to get some of the “must-do’s” out of the way. Take your Zion sign picture and go to the visitor center for some souvenirs and to get a good lay of the land. If you don’t have permits for Angel’s Landing already, then make sure to enter the “next day” lottery on recreation.gov.
If you’re feeling up for something a little more adventurous on day 1, then head up for a sunset at Timber Creek Overlook in the Kolob Canyons section of Zion. It’s a commitment to get there as it’s 40 mi northwest of the visitor center… but nevertheless a beautiful part to explore. Plus, this is your only opportunity to explore this part of the park!
Day 2: Zion National Park, Angel’s Landing Hike
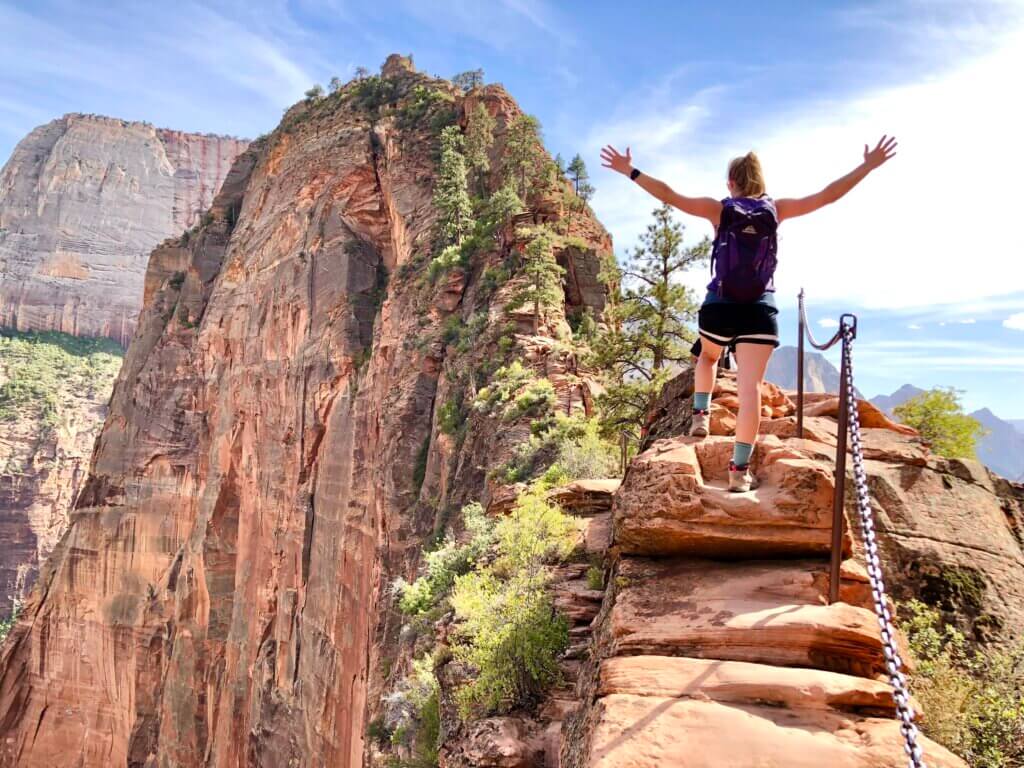
GET READY FOR AN EPIC HIKE! Today you’ll be hiking up to Angel’s Landing (permit required). If you have a fear of heights, or didn’t manage to snag permits, you can try the Canyon Overlook Trail. It provides epic views without the steep drops… but I PROMISE Angel’s Landing is not nearly as scary as it looks, so you should really give it a try!
***Make sure you have sturdy hiking boots and a good day pack! We love these men’s and women’s Solomons for boots, and we both have this Ortovox day pack.
Other hikes in Zion to consider:
- Many Pools
- Taylor Creek
- Observation Point via East Mesa
***Observation Point via East Mesa requires driving on a rough dirt road to access it. 4×4 & high clearance recommended.
Day 3: Zion National Park, The Narrows + East Zion
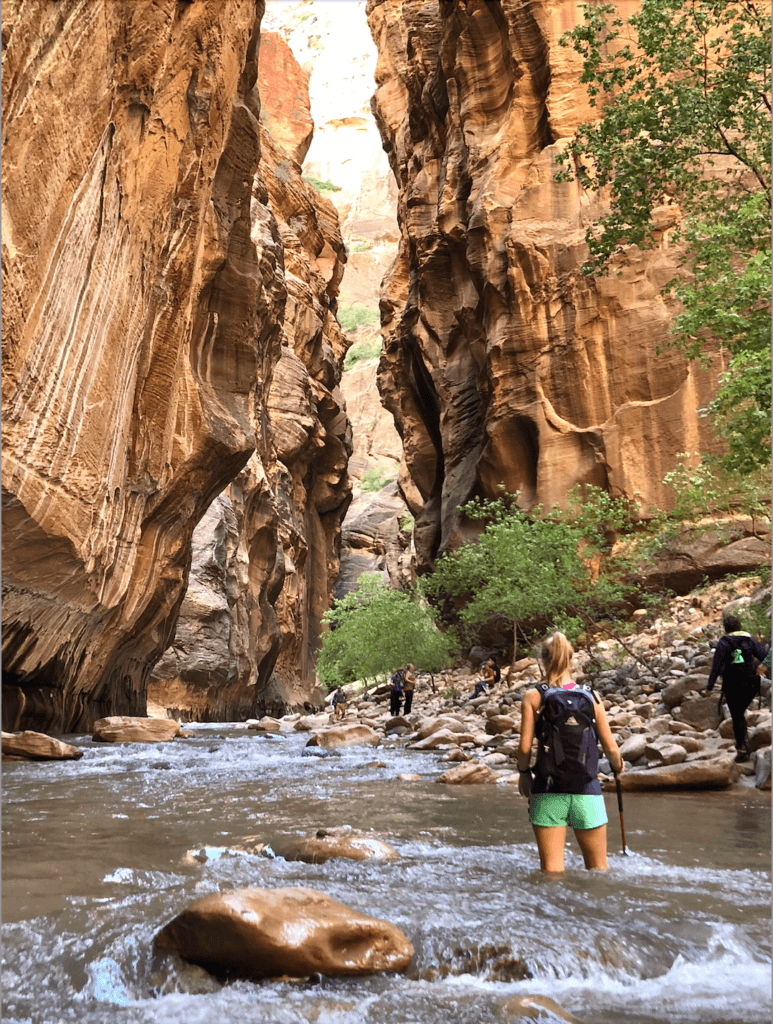
Start your day by hopping on the Zion shuttle system and going straight to the Narrows (stop 9)! “The Narrows” refers to a section in Zion Canyon where the Virgin River flows between towering sandstone walls, creating a “narrow” and dramatic canyon. The best (and most popular) way to experience The Narrows is by wading straight through the river itself! You can go as far as 5 miles one without a permit, but I’d suggest going a mile or 2 one way before heading back! That will give you a perfect amount of time to explore and enjoy yourself. A good pair of trekking poles are ESSENTIAL for this hike!
After hiking the Narrows, you can explore some of the other shuttle stops on your way back to the car. You can choose to hop on/off on your own or do some of the popular hikes listed below:
- Weeping Rock (stop 7)
- Kayenta Trail (stop 6)
- Emerald Pools (stop 5)Watchman
- Zion Human History Museum (stop 2)
- Watchman Trail (stop 1)
Day 4: Zion National Park->Bryce Canyon National Park
Miles: 72 mi
I HIGHLY suggest waking up for sunrise on your last day in Zion. The best sunrise hike is the Zion Canyon Overlook Trail. It’s short and sweet and provides epic views of Zion, perfect for sunrise! Don’t forget to pack a headlamp since you’ll be hiking in the dark to get there!
After sunrise, you should drive BACK west and experience the iconic Zion-Mt Carmel Tunnel! It’s a famous, narrow tunnel about 1.5 miles in length. You probably drove through it already in order to get to your sunrise hike… but it’s so much better to drive it East-West as you get the gorgeous Zion landscape upon exiting the tunnel. The tunnel entrance is right beside the Zion Canyon Overlook Trailhead, so you won’t be going too far out of the way!
***the line for the tunnel can get VERY long especially mid-day. If there’s a line, you should just skip going back through and continue East towards Bryce Canyon National Park.
Once you get to Bryce Canyon, go ahead and do your sign pic and hit the visitor center! You know the drill! You can catch sunset at Inspiration Point if you’re up for it, otherwise get settled in for the night and enjoy a full night’s rest.
Utah Road Trip Day 5-6: Bryce Canyon National Park
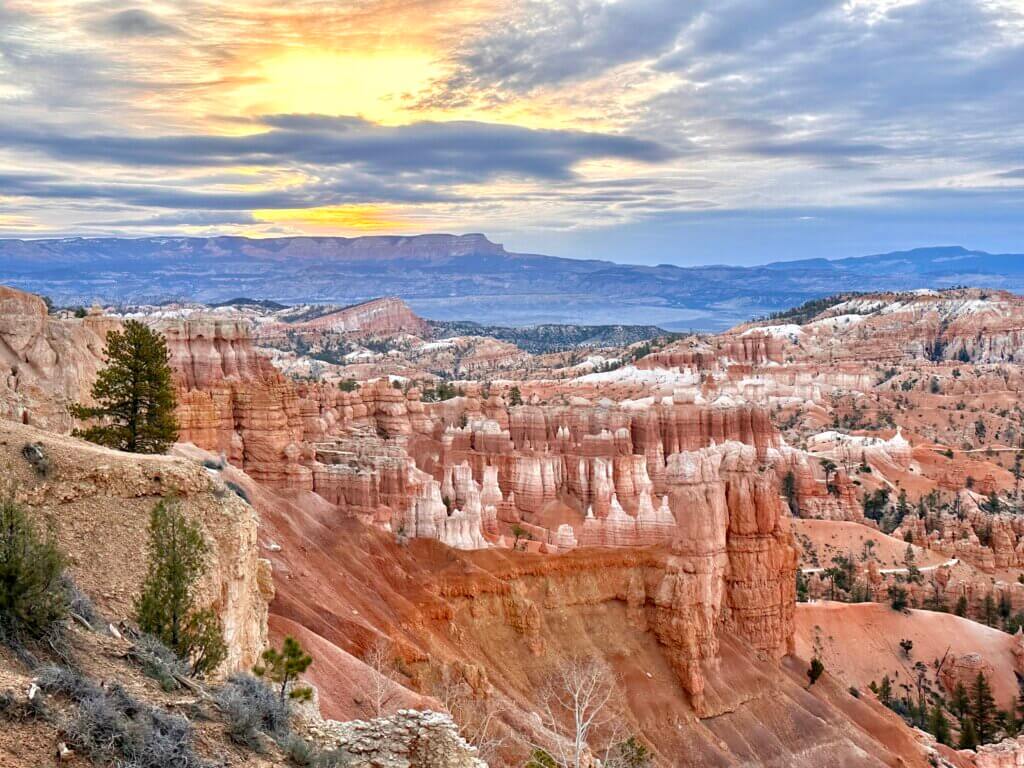
Day 5: Bryce Canyon National Park, Queen's Garden Loop + Scenic Drive
You’ve got a full day of adventure ahead of you for day 5! Start your day by catching sunrise at Sunset Point (yep, you read that correctly). Shortly after the sun rises, you’ll want to head down on the Queen’s Garden and Navajo Combo Loop Trail. This is a VERY popular hike in Bryce Canyon, therefore starting right after sunrise is your best bet to avoid the crowds.
After your hike, you’ll want to start the Bryce Canyon Scenic Drive. The drive is an out and back drive and is about 18 mi one way! The BEST way to enjoy the drive is to go ahead and drive straight to the end of the road without stopping, and then make your scenic stops as you head back towards the visitor center. This way, everything will be on the right-hand side of the road; much safer than pulling across traffic every time you want to see a viewpoint.
If you’re up for another hike you can try out the fairyland loop trail! It is much more remote and less travelled than the popular Queen’s Garden.
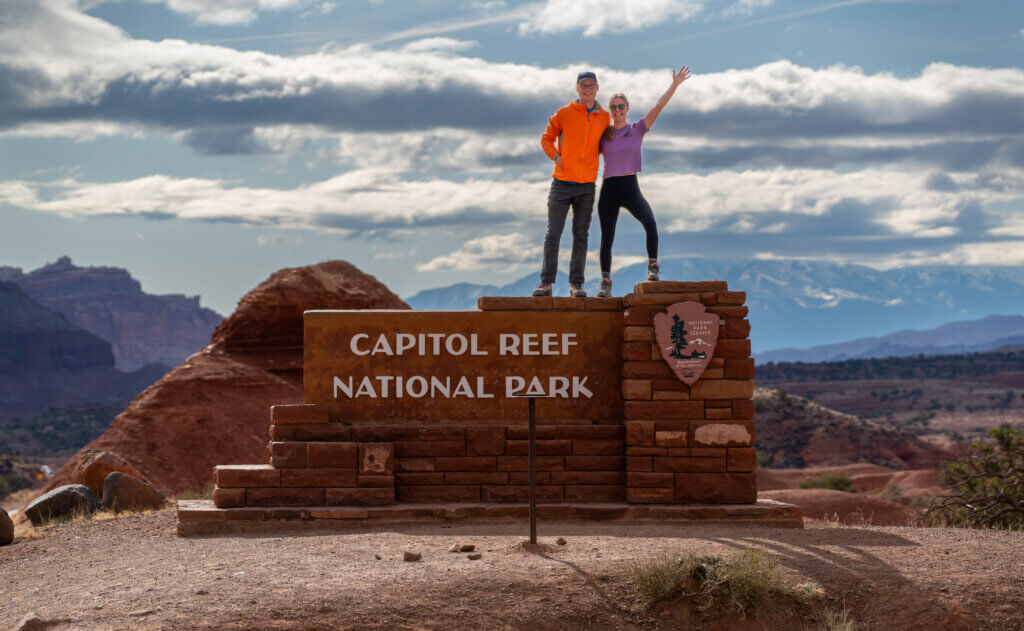
Day 6: Bryce Canyon National Park->Capitol Reef National Park
Miles: 112 mi
Today you’ll be heading towards National Park #3 of the “Utah Big-5 Utah”! Capitol Reef National Park is one of those parks that we had zero expectations for… and it ended up BLOWING us away!
Once you arrive… sign pic & visitor center! I know I sound redundant with that, but it really is nice to get those things out of the way!
Next, you’ll want to hit my personal favorite trail in the park- The Navajo Knobs Trail! The full trail is long & tough being that it’s 9.5 mi & 2,700 ft elevation gain… but if you’re up for the challenge, I say do the entire thing!! Otherwise, you should at LEAST go to the Rim Overlook via Navajo Knobs. It is about 4.5 mi round trip and 500 ft elevation gain. This is the best view in the park in my opinion. BONUS points if you get there for sunset.
Utah Road Trip Day 7-9: Capitol Reef National Park
Day 7: Capitol Reef National Park, Scenic Drive + Temple of Sun & Moon
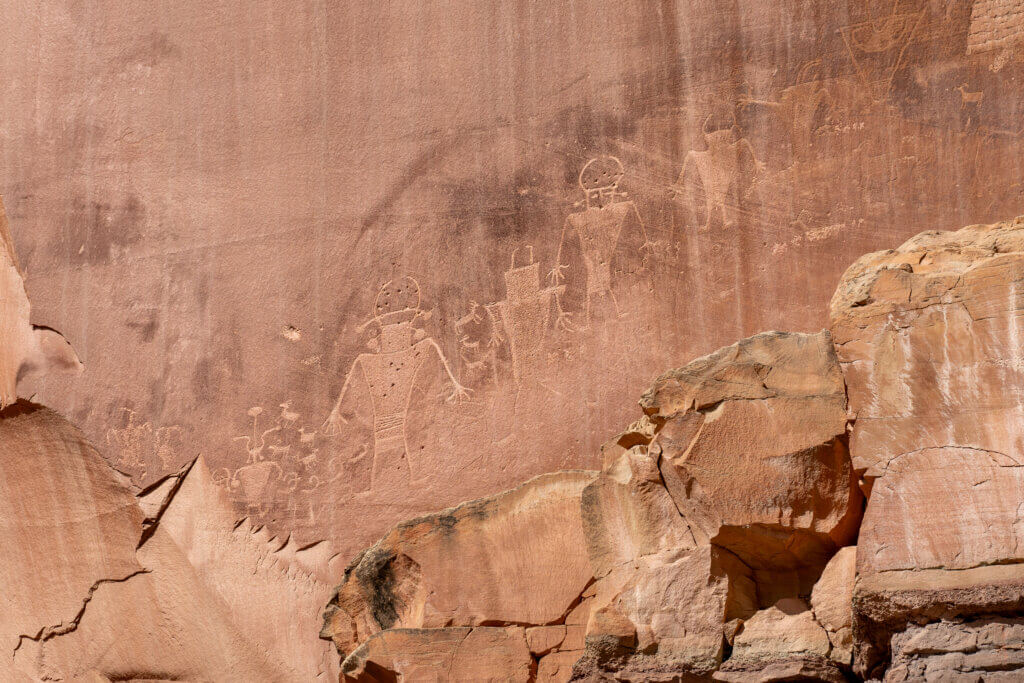
Alright it’s about time for another FULL day of adventure! You’re going to start your day by visiting the ancient Petroglyphs of Capitol Reef. They are located right before the visitor center and I PROMISE they do not disappoint. These ancient rock carvings represent different Native American cultures that inhabited the region over thousands of years.
After the Petroglyphs, make your way towards the Gifford House. The Gifford House in Capitol Reef National Park is a historic farmhouse that serves as a visitor center and a small store. Store wise, it’s not super impressive BUT… every day they serve home-made deliciously hot & fresh pies with ingredients straight from the land. They make them daily on-site and usually sell out by noon. It’s SUPER important you make this your first stop on your way into the park so you can snag one or two before it’s too late!
Alright, NOW it’s time to head out on the Capitol Reef Scenic Drive. The entire scenic drive is about 10 mi one way, so you have time to take some stops and do some hiking if that’s your jam. There are a couple of noteworthy hikes along the way. My favorite hikes are Cassidy Arch Trail and The Grand Wash Trail!
Temple of the Sun and Temple of the Moon
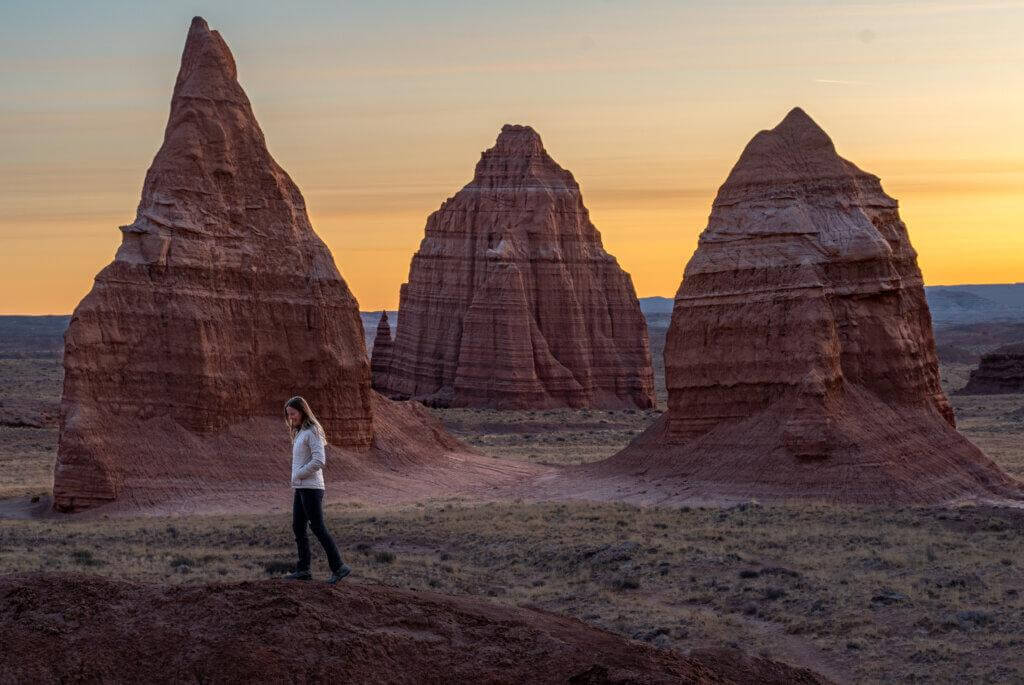
Once you’re done exploring the Scenic Drive, it’s time to head out to the far Northeast corner of Capitol Reef National Park where a little (or shall I say, big) hidden gem resides! The Temple of the Sun and the Moon is our absolute FAVORITE spot in Capitol Reef. It lives down a 15 mi rough dirt road (high clearance and 4×4 recommended) and because it is so difficult to access, there is usually NO ONE around (or very few). In case I haven’t convinced you to make the drive… here’s a little bit about the epic formations-
Temple of the Sun: The Temple of the Sun is a prominent sandstone formation located in the Waterpocket Fold, a major geological feature that runs through Capitol Reef National Park. The Temple of the Sun is characterized by its towering cliffs and intricate layers of sedimentary rock. It gets its name due to its size and grandeur, resembling a colossal temple rising from the earth.
Temple of the Moon: The Temple of the Moon is situated right beside the Temple of the Sun and shares similar geological features with it. It also showcases towering cliffs and fascinating rock layers, giving it a distinctive appearance. The name “Temple of the Moon” reflects the awe-inspiring and otherworldly quality of the formation.
You technical cannot camp at the Temple of the Sun and Moon, but the entirety of the road leading up to them has plenty of dispersed camping! There are sites as close as 0.5 mi from the formations.
Day 8: Capitol Reef National Park->Moonscape
Miles: 32 mi
We’ve got another sunrise call this AM! Head over to the Temple of the Sun and the Temple of the moon for one of the most serene and peaceful sunrises you’ve ever seen. Explore the area as much or as little as you wish before saying goodbye to the beautiful formations!
You’re now faced with 2 options… you can either explore the rest of the Cathedral Valley (ONLY recommend if you have 4×4 and high clearance), or you can go ahead and head back towards Moonscape Overview. As we do not have 4×4, we chose the latter.
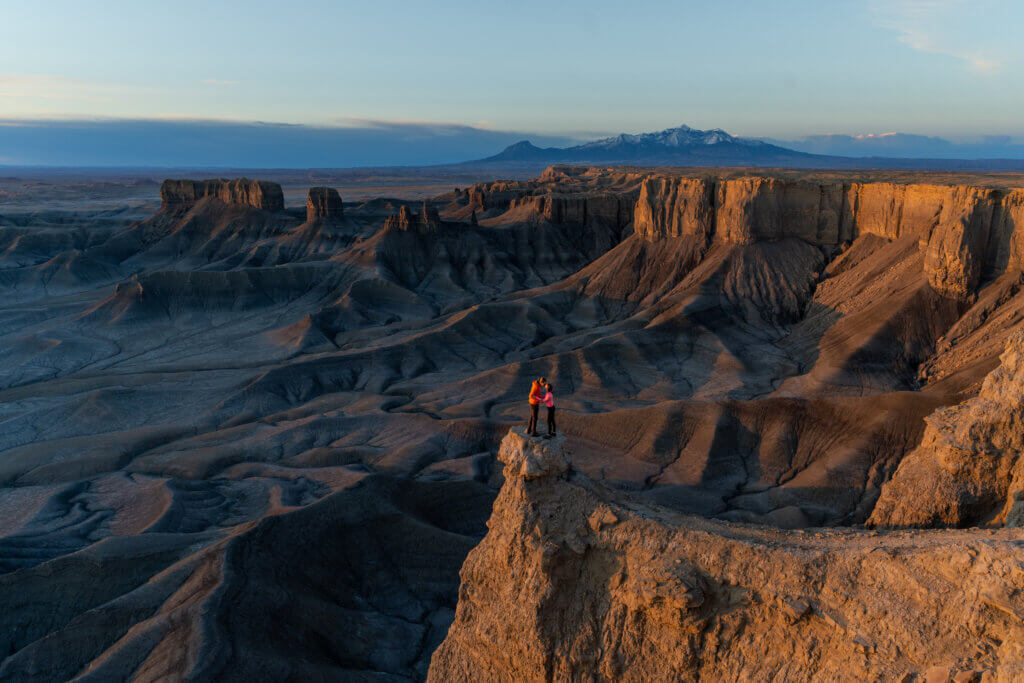
Moonscape Overlook
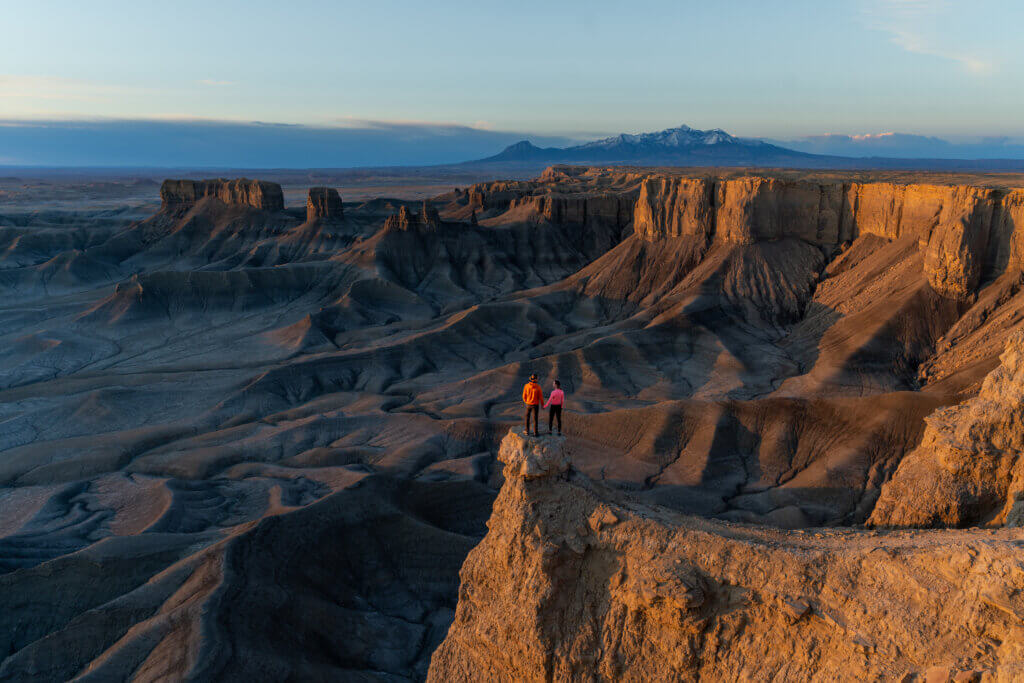
The Moonscape Overlook is a scenic viewpoint located near Caineville, Utah, which offers stunning views of the surrounding landscape. It is situated along Utah State Route 24, approximately 10 miles southwest of the town of Hanksville.
Moonscape provides a panoramic vista of eroded badlands, rugged terrain, and unique geological formations. The landscape is characterized by its undulating hills, intricate patterns, and a desolate appearance reminiscent of the lunar surface, hence the name “Moonscape.” This is truly one of the highlights of the trip and is so unique that it is difficult to describe!
You can (and should) set up camp RIGHT at the overlook and enjoy sunset in one of the most scenic spots you’ve probably ever camped.
Day 9: Moonscape->Moab
Miles: 127 mi
Today is another early wakeup call because you MUST see Moonscape Overlook at Golden Hour!! The way the sunrise lights up the colors of the unique geological formations is unmatched beauty!
After spending the morning at the overlook, it’s time to head towards Moab, the cutest little desert town that you’ll be basing out of for the next 4 days.
Utah Road Trip Day 10: Canyonlands National Park
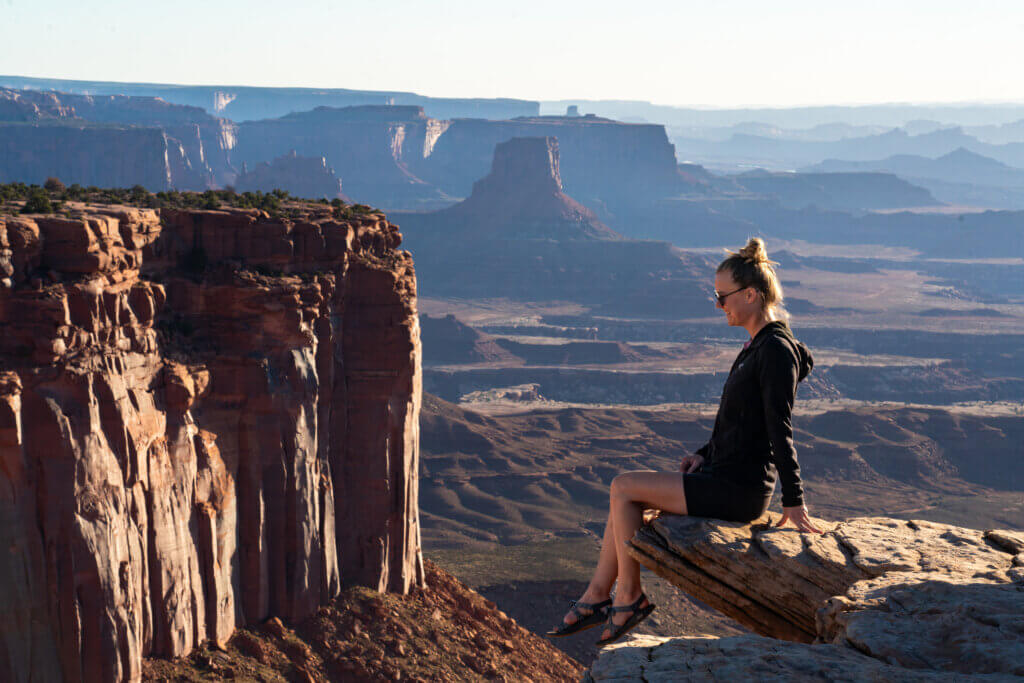
Day 10: Canyonlands National Park, Mesa Arch + Overlooks & Hikes
This is your ONLY day in Canyonlands, so it’s best you get an early start on the day! Canyonlands National Park is MASSIVE. You could spend an entire season exploring the park and barely scratch the surface. The park is laid out into “sections” and one day will be enough to see the highlights of just one “section”.
Assuming it’s your first time to Canyonlands National Park, you should use your one day to explore the Island in the Sky district. It’s the closest section to Moab and has incredible overlooks and hikes.
Today should be another sunrise start! Since it’s your first time to Canyonlands, seeing sunrise in Mesa Arch is basically a right of passage. Yes, it will be crowded… Yes, it’s not the most peaceful sunrise you’ll ever experience… BUT it is incredibly unique and the main highlight of Canyonlands! ***plus, if you wait until mid-day to go see Mesa Arch the crowds will be waaaay worse.
After sunrise, continue along the Island in the Sky district road, stopping at every viewpoint and hike that you wish! For time’s sake, I’m not going to describe each overlook & hike. Rather, I will list each of the one’s we enjoy below:
Overlooks:
- Grand View Point
- Buck Canyon Overlook
- Green River Overlook
- Upheaval Dome
- Schafer Canyon Overlook
Hikes:
- Gooseberry Trail
- White Rim Overlook Trail
- Whale Rock
- Aztec Butte
I know this sounds like a lot, but I promise it can all be done in one day and with time to spare! On your way out of the park, you can make your visitor center and sign pic stops since you bypassed it for sunrise.
Utah Road Trip Day 11: Moab
Day 11: Choose Your Own Adventure
A lot of people don’t realize that there is so much to do in Moab, apart from the national parks! I’m going to give a few suggestions here, but based off what you like to do, you should just spend the day however you like!
- Rock Climbing
- Whitewater rafting
- Off-roading
- ATV rental
- Horseback Riding
- Hiking
- Relax & enjoy the town!
Optional: Dead Horse Point State Park for sunset: I say this is optional, but this is a MUST-DO in my opinion… It’s only 30 min from Moab. 10/10 recommend.
Utah Road Trip Day 12-13: Arches National Park
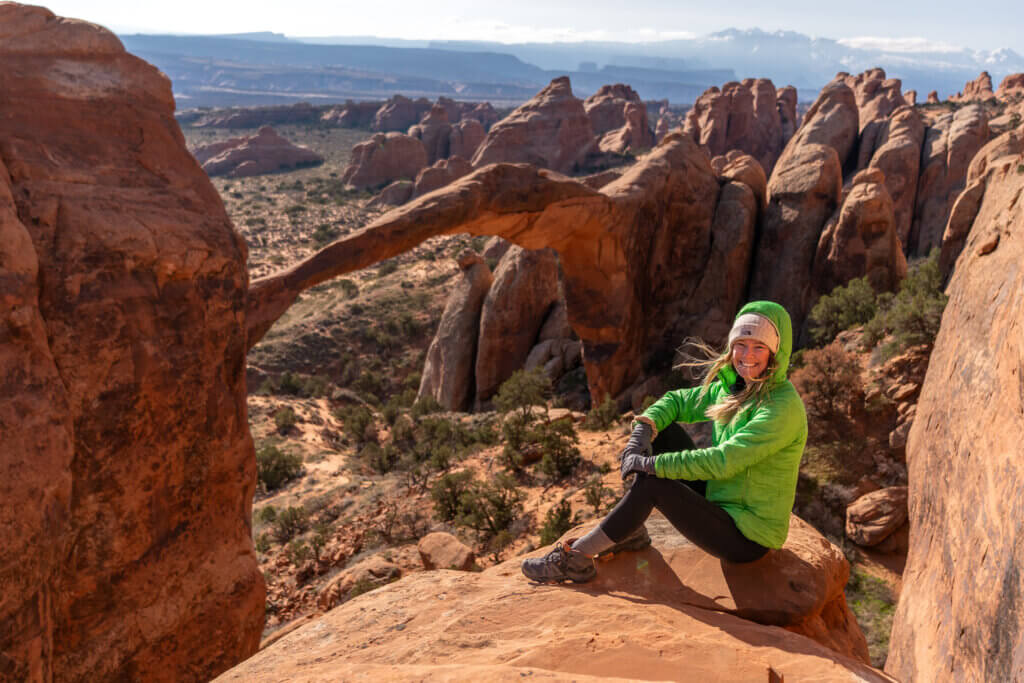
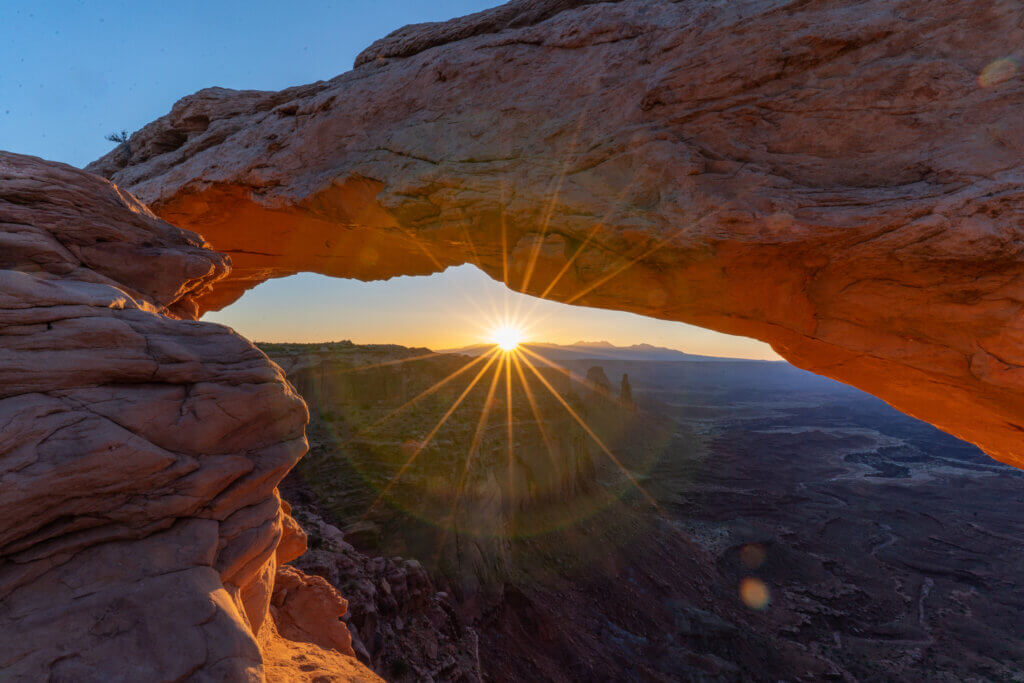
Day 12: Arches National Park, Sunrise + Devil's Garden
Alright, this is the LAST early wakeup call of the trip (MAYBE), so let’s make it worthwhile!
Arches National Park requires a timed entry permit from 7 am-4 pm in the months of April through October. Since you will be entering the park for sunrise, you shouldn’t need a permit… but it’s a good thing to know in the case that you’d prefer to skip sunrise (not recommended)
Sunrise location: the BACKSIDE of Landscape Arch (shown in pic above)
Devil's Garden Primitive Loop
After sunrise you’ll want to hike the Devil’s Garden Primitive Loop. The Landscape Arch is actually the first stop on the loop so you’ll already be on your way if you catch the sunrise here (how convenient)!
The Devil’s Garden Primitive Loop is a long trail at 8 mi long and 1000 ft elevation gain. It is the best hike in the park and the only one that gets you away from all the crowds! I would suggest downloading the alltrails.com map as the route isn’t super defined the entire time.
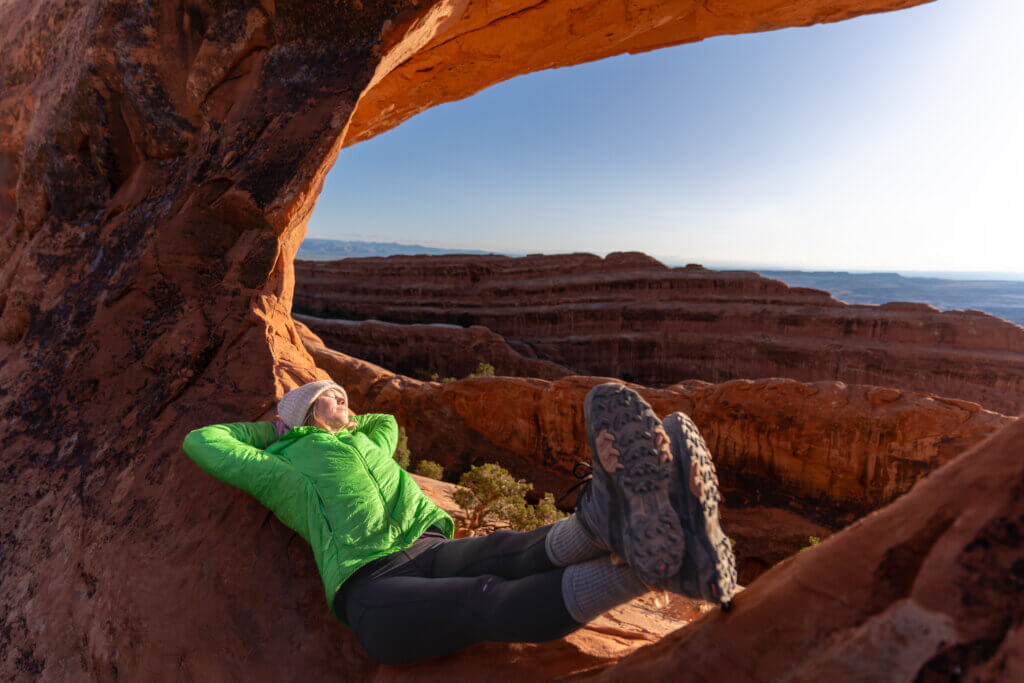
Delicate Arch
This evening you’ll want to catch sunset at the prestigious Delicate Arch! It will undoubtedly be super busy, but the viewing area is large so there’s plenty of room for everyone. Definitely worth doing at least once.
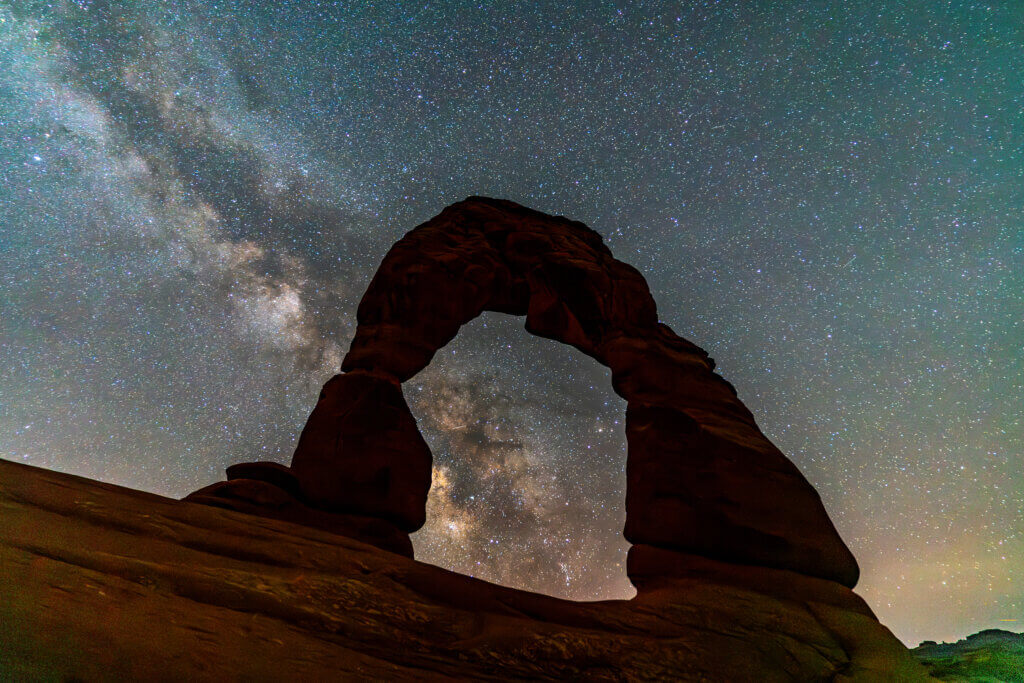
***alternative to sunset at Delicate Arch: STARS at Delicate Arch! Leave the park after your hike and get some rest. Wake up in the middle of the night and make your way to Delicate Arch Trail to shoot the Arch with the Milky Way! If you’re into astrophotography you won’t regret it!
Day 13: Arches Scenic Drive ->Las Vegas
Make sure you snag permits for your timed entry today OR head into the park for sunrise again!
***Another good sunrise spot is Turret Arch
After entry, drive the length of the park and stop at all the easy to see roadside attractions! I’ll list our favorites below:
- Balanced Rock
- Windows @ Turret Arches
- Double Arch
- Delicate Arch (if you haven’t seen it already)
Be sure to stop at the visitor center and park sign on your way out today… it’s your last chance to do so! Once you’re done exploring, it will be time to drive back to Las Vegas and prep to fly home tomorrow.
Utah Road Trip Day 14: Fly Home
Bittersweet, but all good things come to an end!


1 thought on “Two-Week Utah Road Trip, Utah’s “Mighty-5” & More!”
Hey! Absolutely love this itinerary! I’m trying to figure out, what kind of budget range would you suggest for anything from dispersed camping to lodging every night. Trying to get a feel for what to expect!